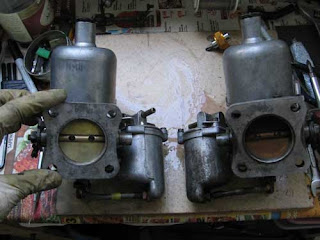
Before I go any further, I should note that there are professionals out there that do this for a living, charge a modest fee for the service, and do a much better job than a shadetree mechanic. Prominent figures in the world of SU ressurection include: Rhys Kent of Island Automation, Advanced Performance Technology, Joe Curto in New York, Chester Gillings, Paltech, and Z-Therapy. Prices and individual experiences vary; I can say that I've spoken with Rhys Kent on the phone, read his posts on Brickboard, and would send him my carbs in a second.
That is, if I weren't a total cheapskate. As my friends and relatives will attest, I am a true cheapskate, and in true cheapskate spirit, I forged ahead with the work myself.
First off, I prepared myself for the very real possibility of ruining my carbs. With that obstacle out of the way, I armed myself with two guides: Tony Rhodes's excellent writeup, and the Chicagoland MG Club's DIY guide. These guides are required reading if you are considering rebushing at home.
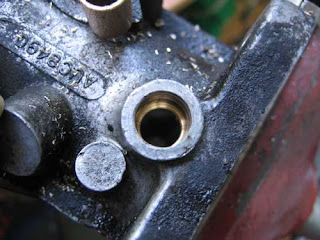
Following the advice of the Chicagoland MG guide, I ordered 5/16" ID, 3/8" OD, 1/2" long, SAE 841 self-lubricating Oilite bronze bushings from McMaster-Carr, part number 6391K153. At $0.69 a piece, I ordered some extras, as well as a set of 3/4" long bushings (part number 6391K155), for the sake of experimentation and error.

self-lubricating Oilite bronze bushing
I waited until after confirming the dimensions of the bushings to order a reamer. Checking the bushings with a dial caliper showed they were, in fact, 0.375", so I went ahead and ordered a straight flute dowel pin reamer from Enco, part number 334-6018. The folks at Chicagoland MG used a 3/8 reamer, Tony Rhodes suggests using an undersized reamer. I used an undersized 0.3745" reamer to get a snug fit on the replacement bushing. (It ended up being a pretty tight fit, and in retrospect, with a +0.001-0.002" tolerance on the bushings, I probably could have gone with a 3/8" reamer.)

The trick to reaming your own carbs is using the shaft of the reamer as a guide. Conveniently, the 3/8" family of reamers from Enco have a 5/16" shaft - a perfect fit for the 5/16" throttle shafts on SU HS6's. By inserting the reamer shaft through both throttle shaft holes, relatively axial alignment of the holes can be maintained. Obviously, this method doesn't yield results as precise as those of a professional armed with a mill, but at $10 for a reamer and $3,000 for a mill, it's a lot cheaper.
It does require, however, that the reamer be modified to cut from the back, rather than the front. I "sharpened" the rear of my reamer using a Dremel fitted with a cutoff wheel.

Finally, I removed my carbs, disassembled them, and mounted them in a bench vise.

ready for surgery
In went the reamer, shaft first, through the entire body of the carb...

With a tap handle attached to the front of the reamer and plenty of WD-40 for lube, I started twisting while applying moderate pressure...

moment of truth
I stopped frequently to check progress.

One of the dangers of this operation is boring all the way through the throttle body. About 1/16" has to be left behind so that the bushing does not migrate into the throttle bore, and to prevent false air around the bushing. (Without a way to machine the bushings flush with the inside diameter of the carb, they would inevitably sit a bit shy of the bore, preventing the butterflies from fully sealing the throttle opening). As a crude reference, I marked the reamer with a Sharpie. A drill stop would be more accurate.

a little bit further...

...still checking progress frequently
A few nerve-wracking moments later, I finished reaming one side of the first carb and was ready to press in the first bushing. I ended up using the 3/4" long bushings, figuring I could drive them to the depth of the reamed hole, and trim off the excess. (I've read that cutting Oilite renders its self-lubricating properties useless, but I've also read the contrary. No idea if this is true or not, so I went ahead with it.)

bushing in place, ready to be driven home
I used the old throttle shaft as a guide, slipping it through both the new bushing and the old bushing on the other side. I tapped it in using a ballpeen hammer against the throttle linkage fork. As previously mentioned, the fit was a bit tight.

probably should have put some Loctite on the bushing
With the bushing fully seated, I "milled" it flush using a file. A 0.376" reamer would probably work better, but the file seemed to do the job well enough.

bushing in place and trimmed flush
With the first side done, I repeated on the opposite side. It's important to do one side at a time, so that there is always a 5/16" hole to guide the shaft of the reamer, keeping it axially aligned. (This is hard enough as it is since the holes are- by virtue of needing to be rebushed- a bit oversized and/or ovalized). I suspect my bushings ended up being slightly out of alignment, as the throttle shafts bind a little when they are going in (but rotate freely once they are in place).
With the bushings out of the way, I moved on to replacing the throttle shafts. The wear on my shafts was pretty obvious, and I wonder if I could have gotten by with just replacing the throttle shafts.

grooves worn in shaft
I ordered new shafts from Victoria British, which had the best price I found on the web ($14.95 each). I ordered shafts for an MGC with HS6 carbs, part number 3-5711. I also ordered new throttle plate screws (part number 3-552) and tab washers (part number 12-4211).
Maybe it's an MG thing, but my throttle plates didn't fit in the slot.

as far as it would go
Upon closer inspection, the slot for the throttle plate was clearly undersized.

new shaft at rear, slot too short
It's possible I was shipped the wrong part, or maybe the shafts just need to be trimmed to fit. Out of haste (or maybe stupidity), I assumed the latter, and took to the shafts with a hacksaw.


cleaning up the cut with a needle file.
With that modification aside, I moved on to removing the throttle linkage fork from the old shaft and installing it on the new shaft. I drilled out the old pin (I wasn't able to drive it out with a punch), and then drilled the new shaft.

Yet another lesson learned: I aligned the hole for the linkage with the throttle plate screw holes. In fact, the hole should be rotated a few degrees (use the old shafts as a guide), otherwise the carb body will interfere with the linkage at wide open throttle. Because of my mistake, I had to file the linkages down a couple tenths of an inch to get enough clearance.
Instead of using a pin to secure the linkage on the new shaft, I tapped the hole and used a set screw secured with blue Loctite.

It took me about half an hour to center the throttle plates, but I finally got it to seal relatively well (I think). It was repetitive and frustrating process of trial and error.

not centered, despite numerous attempts

half an hour later: finally centered, or at least good enough
While I was at it, I drilled and tapped the air filter flanges and installed Helicoils to simplify removal and installation of the air filters for tuning and maintenance.

Rinse, lather, and repeat with the other carb. Here are some gratuitous before and after shots:

before

after, note new tab washers under throttle shaft nuts

in process

complete

2 comments:
Awesome. It was fun following your progress. Thanks for posting the play-by-play and all the pictures.
Excellent but the reamers are no longer available unless you take air a loan!
Post a Comment