That being said, there was still a good amount work to be done on my tired old SU's. Luckily, there is a wealth of information and tech advice on SU's on the web - much of it from the MG and Jaguar community. (I've linked to helpful sites below.)
1. First off, I gave everything a thorough cleaning with carb cleaner, starting with the exterior, then breaking the carb down to its component parts and cleaning everything, particularly the jets, float chambers, and linkages. (If I did this again, I'd probably spring for a dip bucket.)

things looking a bit grotty before the cleaning...

float bowls looking pretty nasty.
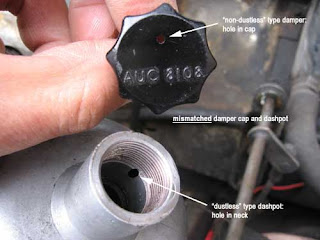
2. There are two types of dashpots - "dustless" and "non-dustless." Dustless dashpots have a vent hole on the inside of neck, while non-dustless types are vented on the damper cap. Dustless dampers should only be fitted to dustless dashpots, and vice versa. One of my carbs had a dustless dashpot but a vented cap, so I plugged the vent on the damper cap with a small screw.

mismatched - vented "non-dustless" damper cap and vented "dustless" dashpot

matched - vented "non-dustless" damper cap and unvented "non-dustless" dashpot

fixed - "non-dustless" damper with vent sealed, and vented "dustless" dashpot
3. I tested the drop of my pistons, and matched them. I used cork stoppers to plug the holes on the bottoms of the pistons, fitted them together without piston springs or damper oil (piston rods should be lubricated with ATF or WD-40, however). Probably a good idea to remove needles as well. Holding one set in each hand, I inverted them and counted while the pistons dropped. (Hold a thumb over the lip of each dashpot to keep the piston from falling out at the end of its run.) It should take each piston 5-7 seconds to drop, and both should drop at the same rate. Turns out my dashpots were reversed.

hold thumb over lip of piston to prevent piston from dropping... to the ground.

tiny corks to seal the piston during testing
4. One of my metering needles was ever so slightly bent. I did my best to straighten it by hand, testing frequently by rolling the needle on a flat surface and looking for the tip to wander.
5. I checked and set the float levels. There are two common types of floats - all plastic and plastic with a metal tab. The metal tab floats can be adjusted by bending the metal tab. All plastic floats can only be adjusted by shimming the needle seat with washers - a frustrating excercise unless you can find really thin washers. I ended up having to file down some washers to get the proper float height. Fortunately, the tolerance- 1/8" to 3/16"- is pretty forgiving. (I think consistency between the two carbs is the more important variable, hence the weakness in my approach to filing down washers.)
I shot for the middle and used a 5/32" drill bit as a gauge. Resting on its own weight, the float should just rest on the gauge (i.e., don't press on the float).

float level set with float resting on its own weight, drill bit used as gauge
5. After digesting countless articles on SU carburetion, I finally owned up to the fact that I was suffering from the dreaded leaky throttle shaft syndrome. Spraying carb cleaner onto the end of the throttle shafts confirmed this (idle fell a few ticks), as did removing the throttle return spring and wiggling the throttle shafts (noticeable play - felt like the thickness of a business card). Despite some trepidation, I decided to re-bush my carbs at home. I also replaced the throttle shafts.
6. Before putting the dashpots back on, I set the jets to 0.060" below the bridge using the tail of a dial caliper, and for future reference, noted how many turns of the jet adjustment nut it took to get to that "baseline" (6 flats from flush to the bridge, 21 flats from screwed all the way in - your mileage may vary).

7. I took care to make sure the jets were centered, testing that the piston and needle dropped freely before and after putting the carbs back on the car. I found that I had to go around in a circle, tightening each of the dashpot screws a tiny bit at a time to prevent the piston from dragging.
8. For good measure, I installed new gaskets between the mainfold, heat shield, and air cleaners. I also replaced the float bowl gaskets. (Float bowl and air cleaner gaskets ordered from Victoria British, FelPro #23511 gaskets were used for the manifold and heat shield- four gaskets total- available from my local auto shop.)
9. I filled the dashpots with damper oil (I used ATF). The oil just needs to be filled to the bottom of the dashpot's neck (excess oil gets forced into the carb and burned off - relatively harmless, but not ideal).

arrows indicate correct level of oil in dashpot
10. I started up the car with the throttle and choke linkages disconnected, let it come up to temperature, and synchronized the carbs using a Uni-Syn. (I'd tried the rubber hose method before, but didn't have much luck.)

not as accurate as a Synchrometer, but better than a rubber hose
11. With the carbs sync'd, I tightened up the linkages, and started fiddling with the jet settings. I lifted each piston a tiny bit (1/32") using a screwdriver, and listened for a change in idle:
- RPMs rise and stay high until you drop the piston, it is too rich. Adjust the mixture on both carbs one flat leaner, then repeat.
- RPMs fall and car sounds as if it is going to stall, it is too lean. Adjust the mixture on both carbs one flat richer, then repeat.
- If the RPMs rise briefly and then settle back down to original RPM level, mixture is OK.

even though I installed piston lifting pins, a screwdriver is actually easier to use
I "cleared" the carbs every few iterations by opening up the throttle to about 2000 RPM for about 5 seconds. After setting the mix, I re-sync'd the carbs, and tested the mix again. (I ended up repeating 2 times before sync and mix came into balance.)

back together and ready to run
With the mix and sync set, linkages tightened, choke and fast-idle adjusted, I took the car for a spin. Wow! No suffocating fumes of unburnt fuel filling the cabin! No stalling on accelleration! A steady idle! Can it be that my carb woes have been put to rest (for now, anyway)?
Here are some links that proved invaluable guidance in my quest for smooth running:
Swedish Embassy
VClassics and more VClassics
Jaguar Club of North America
SU Carbs.com
Chris Kotting
Roger Garnett
Scott Fisher
Idaho British Car Club
Chicagoland MG Club and more and more
MG Owner's Club
And some great videos from John Twist of University Motors that explain the workings of these mysterious, wonderful, cursed devices:
Part I
Part II
Matching Pistons

1 comment:
Good to see you back on the case and winning it too. I wasn't aware of the 2 types of dashpot/dampers. Good to know.
I'd guess in the following quote you mean "out" and not "in". i.e. from the jet screwed right down to full rich, back up to flush with bridge.
"flats from flush to the bridge, 21 flats from screwed all the way in"
Keep up the good work.
Post a Comment